Moving Back to a Tiling WM - XMonad
- Published on
- Authors

- Author
- Manas
- Mastodon
- mastodon @weirdsmiley
Here are my dotfiles.
When I was still using Manjaro Linux back in 2019, I got a nudge to try i3wm. It was my first experience with any window manager. And I spent
nearly 5 years with it, enjoying the absolute control over my workflow. Nearing
the end of 2023, when I finally decided to leave Manjaro (for good), I had a
bunch of options on my hand. Fedora looked really promising at that time. But
even then, I wasn’t sure I was going to be using any tiling window manager. I
happily switched to Gnome in Fedora 40. I ran it along with XOrg so that I could
make my capslock key act as a ctrl when held and as an escape when pressed
once, using setxkbmap and xcape. But only after spending a few months there,
I realized I missed that finer control at my fingertips. So, I resumed searching
for a newer tiling window manager. I was also learning Haskell at that time, so
picking up XMonad was natural.
There are a lot of things that I like about XMonad apart from its standard tiling manager features. I enjoy writing the configuration in Haskell. Where ever possible, I try to leverage the benefits of Haskell’s strong type system. Defining keybindings with a strong type system ensures that I cannot go very wrong with it. Using stack for building my configuration allows me to port the entire configuration easily to other systems, which are my various virtual machines. I have split configuration in various modules.
src
├── Keybindings.hs
├── Layout.hs
├── Plugins
│   ├── Bluetooth.hs
│   ├── Pomodoro.hs
│   └── Soundtrack.hs
├── Preferences.hs
├── Theme
│   ├── Dmenu.hs
│   ├── Font.hs
│   ├── Theme.hs
│   └── Xresources.hs
├── Workspaces.hs
├── xmobar.hs
└── xmonad.hs

3 directories, 13 files
If you want to poke around the config according to your needs, go through Preferences.hs. It contains lots of variables which can be customized like terminal emulator, browser, scratchpads, window gap size etc. It also contains a list of applications which you would like to start automatically at boot.
Overall, the modularization has turned out to be pretty in terms of categorizing things. I tried writing a few xmobar plugins for my own needs. The guide for writing them was straightforward to begin with. I also wrote my entire xmobar configuration in Haskell itself, keeping this executable in the same project. In the end, the project itself became a one-shot way for an entire desktop environment which I can easily clone, compile and install on any system.
1. Setup
I will go briefly over the stack-based setup. The only thing needed is to have a build script at the root of your xmonad project. Everything else is simply a
normal stack project with modules and a few executables. I have 2 executables in
my project: xmonad and xmobar.
A detailed description and example build files can be found here. My build script is simple enough.
#!/bin/sh

SRC_DIR=$HOME/.config/xmonad
WM=xmonad

unset STACK_YAML
FAIL=0

cd $SRC_DIR
stack install 2>.log || FAIL=1

ln -f -T $(stack exec -- which $WM) $1 2>.log || FAIL=2
2. Installation
Stack is a package manager for Haskell projects and it will be used to compile the package. Install stack either via GHCup or your distribution’s package manager.
mkdir -p $HOME/.config/xmonad
git clone --branch release https://github.com/weirdsmiley/xmonad $HOME/.config/xmonad/
cd $HOME/.config/xmonad
./install.sh
The installation script will install a few fonts and other tools which are
default for this setup. It will also write .xinitrc and .Xresources files.
After the installation is complete, and you are logged into xmonad, pressing alt+shift+/ or alt+? will open up a dialog box containing all available
keybindings.
3. Diving in
3.1. Layouts and per-workspace layouts
XMonad provides a very easy way to describe various layouts that workspaces can follow. I found it useful to constrain only a few layouts on each workspace. I used PerWorkspace for this. This allows me to only switch between specified set of layouts. So for example, my workspace 2 is my writing workspace, in which I have 3 applications. A browser, a pdf reader and a terminal with a tmux session attached to it. This can simply be arranged as a three column layout. But sometimes certain pdfs may have smaller font size which can be tough to read in a column. If I zoom in the pdf it spills sideways, and I have to use arrow keys or h,l to move left and right.
To tackle this, I have another layout with added magnification on top of the three column layout. It magnifies the focused window by a certain limit. And having only these two layouts in my layout set helps me in easily cycling between layouts. I don’t have to skip through 4 different layouts which I would never use in this workspace.
3.2. Topbar modification
By default, XMonad adds a border to the tiled window which is in focus. I took this idea from here. This adds a title bar with formatted colors. This looks nicer that having a border surrounding the window. The focused window is colored blue while unfocused is colored black. Also, having the title names in topbar looks nice, and in a way removes the need of using XMonadLog’s application names in xmobar itself.


3.3. Type safety in keybindings
This is something which I truly adore about XMonad and writing its configuration in Haskell. I can write my keybindings in a functional manner and leverage Haskell’s type system to ensure safety. Arranging keybindings in this way, seems more fruitful than having them represented via strings.
myKeys :: XConfig Layout -> M.Map (KeyMask, KeySym) (X ())
myKeys conf@XConfig {XMonad.modMask = modm} =
  M.fromList -- list of keybindings
    $ [
      -- Restart XMonad
      ( (modm, xK_q), safeSpawn "xmonad" ["--restart"])
      -- Toggle fullscreen
      , ((modm, xK_f), sendMessage $ Toggle NBFULL)
      -- Lock screen
      , ((modm, xK_l), unGrab *> safeSpawn "env" myLockscreen)
      ]
Each keybinding is comprised of two values of types: KeyMask and KeySym,
followed by an X () action. If you don’t want to set a keymask simply pass a 0 or noModMask.
3.4. Submap keybindings and makeChords
Using submaps in xmonad-contrib, I can write a utility function to easily generate a set of keybindings with an added description.
import XMonad.Actions.Submap
import qualified Data.Map as M
makeChords :: a -> [((KeyMask, KeySym), String, X ())] -> [(a, X ())]
makeChords majorKey subKeys =
(majorKey, submap . M.fromList $ map ((k, _, a) -> (k, a)) subKeys)
: [ ( majorKey
, visualSubmap myVisualSubmapDef
$ M.fromList
$ map ((k, d, a) -> (k, (d, a))) subKeys)
]
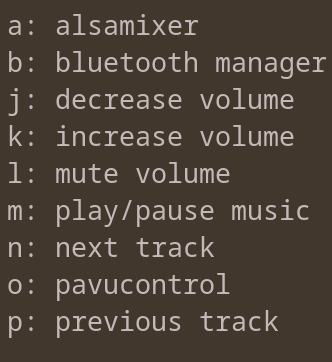
soundChords modm =
makeChords
(modm, xK_a)
[ ( (0, xK_a), "open alsamixer"
, spawn $ myNamedTerminal "alsamixer" ++ " -e alsamixer")
, ( (0, xK_m), "toggle music playing"
, getRunningPlayer' >>= player ->
spawn $ myMusicCtrl ++ " -p "" ++ player ++ "" play-pause")
]
myKeys conf@XConfig {XMonad.modMask = modm} =
M.fromList $ [] ++ soundChords modmThe makeChords adds two distinct sets of keybindings, one normal set and
another a visual set, which creates a dialog box when you press the main submap
key. In the example above, the soundChords submap is enabled with alt+a,
then you can see a dialog box containing two keybindings with their
descriptions. Pressing either a or m will launch the first or the second
action. The documentation also contains an example which you can read to see the actual code that will be
appended to your myKeys.
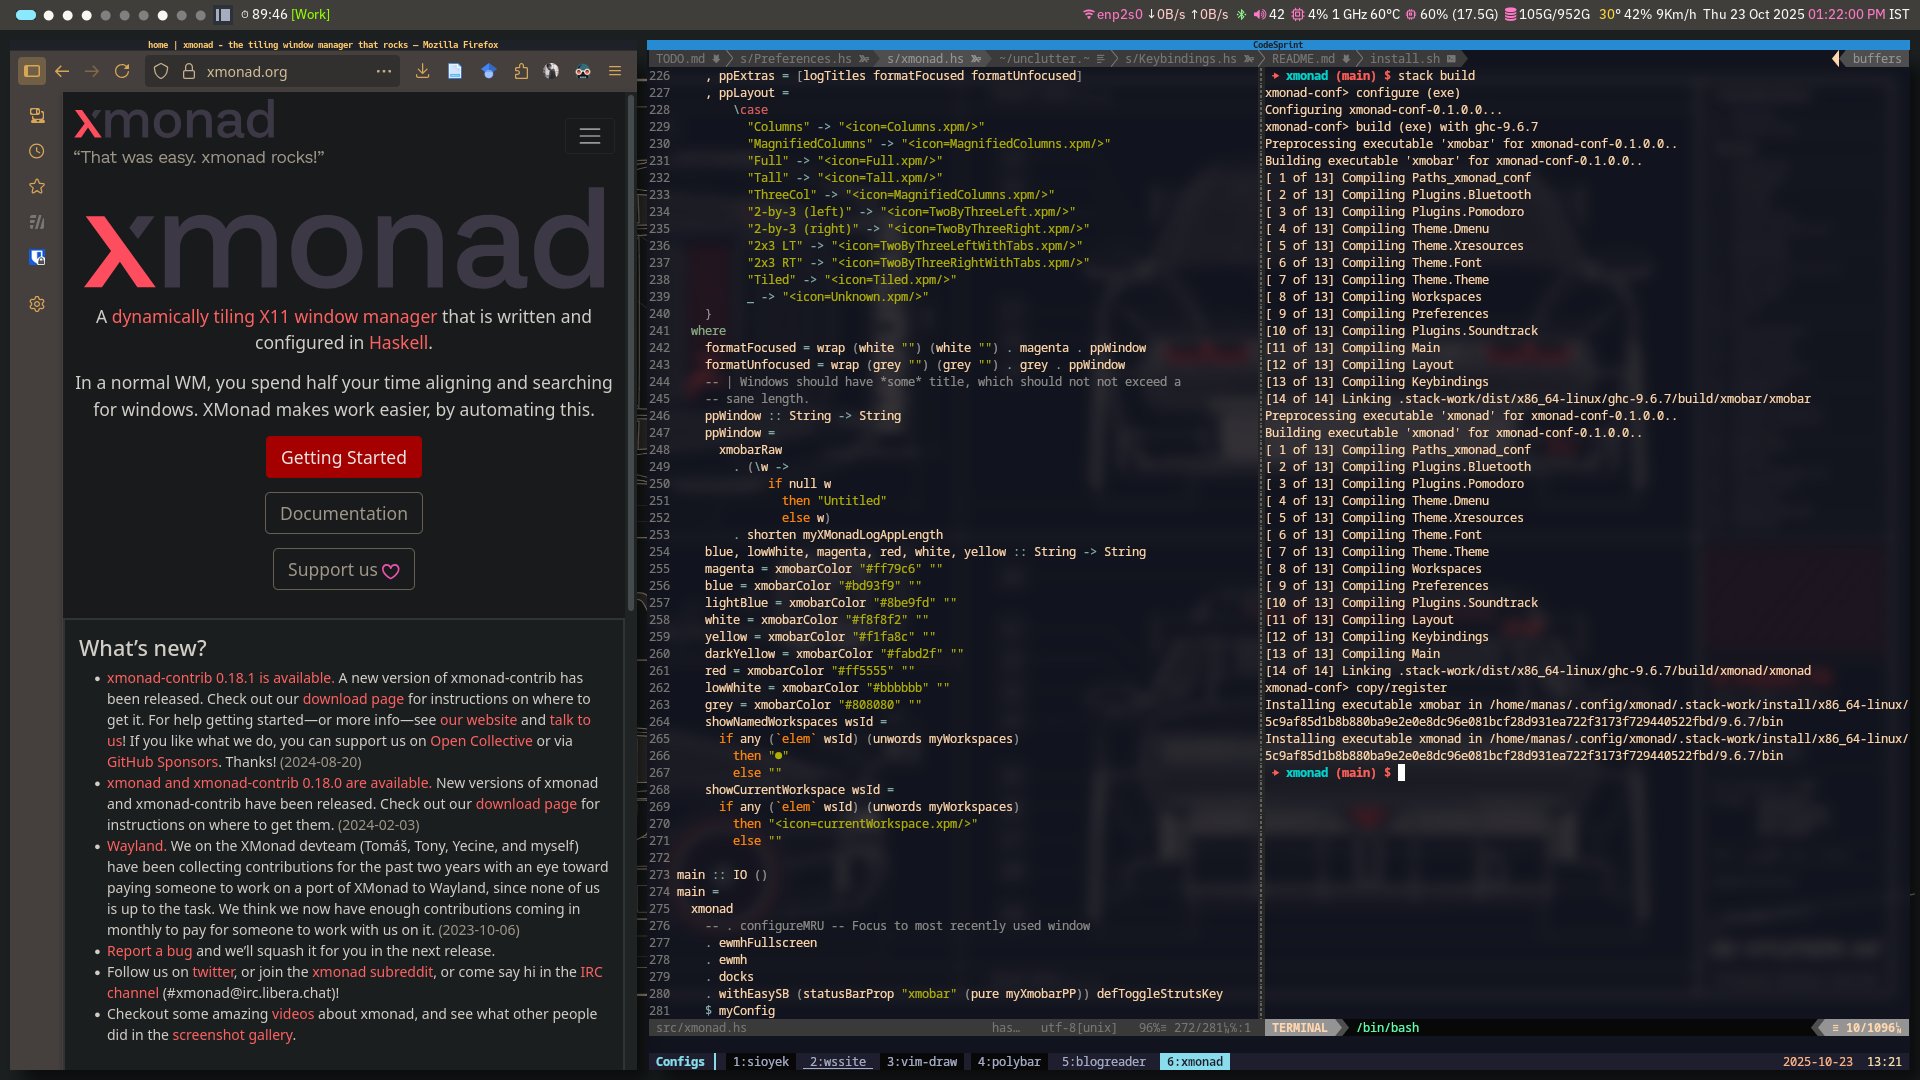
3.5. Xmobar configuration in Haskell
Writing the Xmobar configuration inside the same project really allows me
to keep everything in one place. I create another executable alongside the
xmonad executable, in my package.yaml. And then xmonad launches xmobar in the
startup apps section.
executables:
  xmonad:
    main: xmonad.hs
    dependencies:
      - xmonad
      - xmonad-contrib
      - containers
  xmobar:
    main: xmobar.hs
    dependencies:
      - xmobar
    ghc-options: -rtsopts -threaded -with-rtsopts=-N
You may have noticed a small icon beside my layout icons on the left side of
xmobar. The represent the current layout in a visual form. Try switching layouts
with alt+space and see the icons change.

myXmobarPP =
  def
    { ppLayout =
        case
          "Columns" -> "<icon=Columns.xpm/>"
          "MagnifiedColumns" -> "<icon=MagnifiedColumns.xpm/>"
          "Full" -> "<icon=Full.xpm/>"
          "Tall" -> "<icon=Tall.xpm/>"
          "ThreeCol" -> "<icon=MagnifiedColumns.xpm/>"
          "2-by-3 (left)" -> "<icon=TwoByThreeLeft.xpm/>"
          "2-by-3 (right)" -> "<icon=TwoByThreeRight.xpm/>"
          "2x3 LT" -> "<icon=TwoByThreeLeftWithTabs.xpm/>"
          "2x3 RT" -> "<icon=TwoByThreeRightWithTabs.xpm/>"
          "Tiled" -> "<icon=Tiled.xpm/>"
          _ -> "<icon=Unknown.xpm/>"
    }

main =
  xmonad
    . withEasySB (statusBarProp "xmobar" (pure myXmobarPP)) defToggleStrutsKey
    $ myConfig
3.6. Scratchpads in action
I am using 4 scratchpads in total. Each scratchpad is mapped to a keybinding.
  [
  -- Open Scratchpad
  ((modm, xK_Return), namedScratchpadAction myScratchpads "terminal")
  -- Open Kanboard session
  , ((modm, xK_x), namedScratchpadAction myScratchpads "Kanboard")
  -- Open CalibreWeb
  , ((modm, xK_z), namedScratchpadAction myScratchpads "CalibreWeb")
  -- Open Anki
  , ((modm, xK_m), namedScratchpadAction myScratchpads "Anki")
  ]

myScratchpads
 =
  [ NS "terminal" spawnTerm findTerm manageTerm
  , NS "Kanboard" spawnKanboard (className =? "Kanboard") doFullFloat
  , NS "Anki" spawnAnki (className =? "Anki") doFullFloat
  , NS "CalibreWeb" spawnCalibreWeb (className =? "CalibreWeb") doFullFloat
  ]
  ...
I realized that I don’t really open new terminals that often because I use tmux
(with tmux-resurrect and tmux-continuum). So I remapped alt+enter with showing the terminal scratchpad, instead of the usual, open a new terminal.
I can open up the calibre-web instance with alt+z, and immediately resume
whatever I was reading.
If you have any questions for me, head over to this discussion page.